Pages

Tuesday, January 31, 2012

Let there be light fittings


Last week the light fittings went in.
Our new upstairs looks more "finished" every few days!

I have tried to match the style of light fittings to our 
1920s/1930s bungalow, selecting an antique copper finish
for most lights.


Over the stairs I was hoping we could install the lovely leadlight
light fitting I bought at a market last year,
but sadly an important piece was missing.
I'll find something else to do with that piece.

Instead I was fortunately able to run out that morning 
and find a match to the (discontinued?) wall light I bought 
last year at Beacon Lighting, 
One for the landing, and one for the top of the stairs.


Downstairs we had the original bakelite light switches
which sadly needed to be replaced for safety reasons.
We sourced some plastic imitations,
which are not so nice,
the screws show and they don't make a nice 'plunk'
like the old switches did.
The electrician doesn't like them
(too much work)
and they need a backing block when placed 
straight into the gyprock.

But they do add to the period feel of our brand-new upstairs!


In the hall we have a lovely pendant light from Recollections.
I love the way it is not flush to the ceiling
but not too low, either.
We have plenty of height upstairs with 2.4m ceilings,
although not so tall as downstairs where we have 3m ceilings.
no poky low rooms for us
- we have lived all our lives with high ceilings!


When the sun shines in this hall is lovely ...
And when the electricity is actually connected
these lights will look even better LOL!


In the bathroom we are having a stainless steel/silver/chrome look/
This Ikea light was perfect, rated for bathrooms and only $12.00.
Woohoo!


And in the bedrooms we've installed fan lights, 
simple, modern and clean.


These rooms will get really hot in summer so fans are essential.

Over the weekend we painted some more,
Today the tiler, the gyprockers and the painters are here.
More photos to come!


Linking to Tuesday's Treasures

Wednesday, January 25, 2012

Architraves, Skirting and Doors


I haven't posted so much lately on the progress of our upstairs extension.
Last week the carpenter did a brilliant job with the architraves and skirting boards,
matching our original 1920s/1930s features downstairs.


This is Laura's room, looking much more like a bedroom now with a door,
timberwork and a wardrobe.


We found bungalow doors to match our original doors.
Here you can see down the hall into Emily's room, 
with the linen cupboard on the left.

We decided to go with a flush door 
for the linen cupboard
rather than have a door custom made,
it is narrower than the other doors
and once painted it should all blend in.


Now inside Emily's room looking back out to the hall.


I'm really happy with the doorknobs we picked out.
Our downstairs doorknobs are a mixture
of styles, along the line somewhere someone
replaced the knobs but not the plates of some of the doors.

So we picked out something suitable in style
for the age of the house.

I didn't want to walk upstairs and feel as if
we were suddenly in a modern project home
instead of an old bungalow,
so I'm glad we could source these features, 
they are definitely worth the extra expense.

So now we have a lot more painting to do in the next few weeks!

Thankfully painters are up on the roof now,
painting the exterior, despite the damp, miserable weather here.

Wednesday, January 18, 2012

Tutorial: How to Block your Crochet


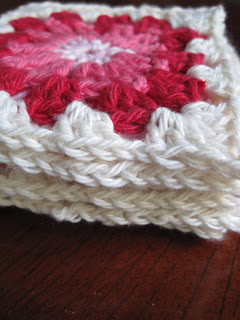
I've been enjoying crocheting my pink-red-cream cushion
and enjoying the way the circles turn into squares.

This rug was my inspiration.

Once I completed my nine squares
it was time to block them.
As you can see from the photo above, they were more 
circular than square in some parts,
tending to bulge on the sides.

I thought I'd give a tutorial on 
Blocking Your Crochet
using the spraying method.


Materials needed:

 *Crochet piece/s to be blocked

*stainless steel pins 
(to prevent any rust spots appearing on your work)

*flat piece of polystyrene foam
(ours was part of the packaging for our new fridge
if you don't have polystyrene you could use a cork square
or a towel spread tight on a carpet or bed)

*ruler or tape measure
(to rule up straight lines and measure sizes)

* Spray bottle of water
(or you can use spray starch, depending on your item)


Start pinning your work in one corner, 
along a straight edge, if possible.
Pin the two adjacent corners and lastly the diagonally opposite corner.

This is where you might want a ruler to measure your sides
to keep it square.

If you are blocking multiple pieces then keep pinning them as above, 
taking care to make each block the same size as the first one.

My piece of foam was conveniently just the right length 
for all my blocks :-)


I didn't bother with the ruler this time,
as it was easy to match the line of the foam board.


I love the first look of the squares like this
Neat and straight
all my wiggles stretched out!

Next, spray your pinned work lightly with water (or starch)
and leave to dry.

Here are the squares after they had dried and been unpinned:


Lovely and square, with nice sharp corners.
They are flatter than before, also.


When I came to join my squares
I needed to crochet around the edge of each of them
before joining.  
In hindsight I should have remembered to do that before blocking.

Once I'd done the extra crochet and then some
not-so-neat stitching them together
it was all looking pretty wonky again.
I didn't take a photo of that, it was late at night
and I wanted to get on with blocking it again.

I blocked the large square using exactly the same method,
only this time I used a larger piece of foam
and added some pins in the middle of the work 
to keep all the lines straight.


If you look closely you can see a few pins on inside corners.


Now I'm just waiting for it to dry 
before I add some more granny rows around the edges.
After that I will block it again, 
and photograph the finished cushion.

Depending on your work 
and the size of foam you have available 
you may want to block in stages, as I did, 
or at the end when you have finished.

Here is a photo of my granny square rug being blocked:


This was before I had foam from the fridge,
I had to use an old (but clean) piece of carpet
which was curled up a little and only just big enough.
I had to block them all in a hurry because our renovations 
were about to begin,
and it was hard to keep the pins in place,
hence the not-so-straight edges.
But they turned out fine, the finished
rug is lovely and square.
One day when our living room is not part of a building site,
I'll post a photo!

So you can see that blocking is very easy, 
but it will make a huge difference to your
finished crocheted item!

Colour in my Kitchen


It's not often that Steve unloads the dishwasher in rainbow order LOL.
And with the school holidays the washing is a lot more colourful than usual.


And right next to the rainbow of dishes
is a jug of spectacular bulbs 
which are growing in our backyard as weeds,
below the scaffolding.


A good antidote to the sound of circular saw and nailgun upstairs.

Knitted Hangers - Bunchy Bloomers and Clean Striped


Steve gave me the lovely Jane Brocket's The Gentle Art of Knitting for Christmas.


(which I actually found for myself a few days before, on special!)

and I couldn't get knitting soon enough.

On Christmas night,

Steve headed off to bed with a migraine :-(

and I sat down to watch

my new DVD 

Lark Rise to Candleford

and knit.

I needed something quick and easy with little

decision-making involved.


I chose the Bloomer pattern hanger from the book

and a pale yellow acrylic yarn from my stash

and got knitting.


Then I added some cuteness.


Done!

Not as bloomer-looking as Jane's, perhaps, but satisfying nonetheless.

* * * 

This week the knitting bug caught again 

and I craved stripes in cotton.


I started knitting up some cotton yarns from my stash

which are really too pale to go with most of my cotton yarns.


And then for some contrast on one side I added a few brighter coral stripes.


After a couple of nights of watching 

Mentalist and Band of Brothers 

it was finished.  

No rush here,

the pleasure is in the knitting

and the mixing of colours.


I sewed it over an old satin-covered hanger

And I love it.

But perhaps it needs something else?

A little more aqua?


Too floppy


Better.

Or maybe I'll go back to the plain, striped look?


Next up, something more ambitious ....

Tuesday, January 17, 2012

The Builders are Back


After a 3-week break, the builders are back.

Actually, just a carpenter with other men dropping in occasionally ....

In those 3 weeks, we have ...

celebrated Christmas, 
had a family get-together, 
relaxed a little, 
shopped,  
been to church,
went on a picnic,
saw Tintin,
slept in,
watched DVDs,
Steve worked 4 days, 
we celebrated Emily's birthday 
and then we split into two groups (adults and children!) 
for a short break last week (post to come!) 

But mostly, it feels like we have painted


and painted


and painted.


At least the progress is obvious:

As we first saw Laura's new room on 20th December

Same corner early this morning

But there's plenty more to come, 
today the carpenter started on the doors and door architraves.

Then there's the rest of the gyprocking to be done,
and the stairs to be finished 
and the skylight to be put in ...

and then there's the slight matter of the toilet door that can't fully open
due to the new stairs above.


Yes, sad but true.

(But we have a plan for that!
Thanks to my dad.
Anyway, that's another story ....)

All of that will need to be painted.
We'll be at it for weeks yet.
But we were pleased to paint almost everything we could
before today, just one more coat needs to be done on a couple of windows.

Which is pretty good, I guess, 
considering everything we've fitted into the last 3 weeks!

Tuesday, January 10, 2012

Emily turns 14


Emily turned 14 on Saturday!
She is such a lovely girl,
we are proud to be her parents.

We celebrated with a trip to
the Olympic Aquatic Centre at Homebush

then a movie night at home
watching Fantastic Mr Fox.

Emily loved the Sylvanian Families ambulance
we gave her, although she asked for it months ago
she wasn't really expecting it!

On Sunday Mum and Dad came over for lunch
and yesterday afternoon the girls went to Mum and Dad's 
for a 3-night sleepover.

* * *

And what are we doing with our child-free time, you might ask?

Well, yesterday afternoon there was lots of this:


Painting under the new stairs.

Apparently if you don't paint two coats under the stairs
they will warp and cup after you varnish the tops of the stairs.

Steve's job was the high parts, including this tricky and dusty spot 
between the ceiling and the new floor.


And my job was to paint under the main part of the stairs.


To paint this I had to lie on my tummy
or my back
or my side
whatever it took to get each surface covered.
Yuck!

But it's done now, 
and we have nicer plans for the next two days :-)
Stay tuned!